Announcements

Hari Om Parents,

Our next class is on May 18th, 2014. It is the day for the souvenir photo shoot. Please check the blog for updates on important events.

Please visit www.chinmayavrindavan.org for events and other important information.
Showing posts with label Art Project. Show all posts

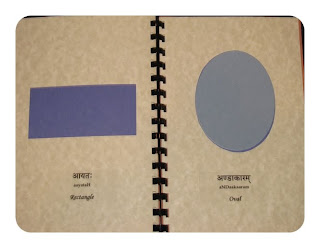
Sanskrit Book of Shapes, Colors, etc. (Year end project)


Materials:
Designer Hand made paper
5 Designer card stock cards
Hanuman sticker
Rhine stone stickers
Construction paper in different colors
Spiral binder
Spiral binding spine
Clear printable labels

Directions:
1. Size and cut the hand made paper (outer cover) to the required dimensions.
2. Fold the card stock cards in half.
3. Punch holes in each of the card stock halves, by the edge that is folded.
4. Punch holes correspondingly on the outer cover papers as well.
5. Spiral bind the outer covers along with the card stock (the card stock will be the the pages of the book).
6. Stick the Hanuman sticker on top cover.
7. On a clear label, print the sanskrit script, transliteration as well as translation, in 3 different lines (Sanskrit script for the book).
8. Cut to size, the script, for the content of the book.
9. Stick the script on the bottom of the pages, as per desired order.
10. Get Swamiji's blessings on the book (his signature).
11. Make die cut shapes out of construction paper of different colors.
12. Apply glue to the backs of the die cuts and lay them on the respective pages of the book, firmly.
13. Decorate the book with the rhinestone stickers, as per taste.
14. Make sure you practice all the sanskrit words we have learnt in class!

Monkey Mask


Materials:
Light paper plate
Brown paint
Yellow construction paper
Quarter
Scissors
Cotton ball
String
Glue

Directions:
1. On the back side of the paper plate draw out two quarter sized circles for the eyes.
2. Put a blob of brown paint and spread it around with a cotton ball.
3. Cut out the spiky edges of the plate to give it more even look.
4. Punch out holes by the eyes to tie the strings.
5. Print out or draw the ears and mouth of the monkey as shown.
6. Cut and glue them on to the mask.
7. Tie the strings to the sides.
8. Tie the monkey mask onto the face of your little monkey :).

Woodcutter's Axe


Materials:
Light paper plate
Wooden stick (paint stirrer)
Aluminum foil - 2 pieces
Glue
Scissors - under adult supervision

Directions:
1. Fold the paper plate in half.
2. Draw arcs on both sides, to make the shape of the axe blade.
3. Cut out the arcs to get the blade of the axe.
4. Glue the blade the to the wooden stick, making it the handle of the axe.
5. Wrap the bigger sheet of aluminum foil around the blade, including the handle near it.
6. Wrap the smaller sheet of foil around the rest of the handle.
7. Tuck the extra foil all around to give a neat finish.
8. The axe is ready to go!

Elephant with a Mysterious Trunk


Materials:
Light paper plate
Construction paper
Googly eyes
Grey paint
Cotton balls
Scissors - under adult supervision
Toddler hand!

Directions:
1. Draw a small circle (as per the size of the child's hand), slightly off the center of the plate.
2. Put a blob of gray tempra paint and spread it around with the cotton ball.
3. Cut out the circle drawn.
4. Glue the googly eyes above the hole, on the shorter side of the plate.
5. Cut the shape of large ears on a piece of construction paper.
6. Glue them to the sides of the plate.
7. Now, push the plate through the child's hand, making his/her hand serve as the trunk!
8. Trumpet along and act as if the elephant is drinking water, taking a shower and whatever else you can imagine.

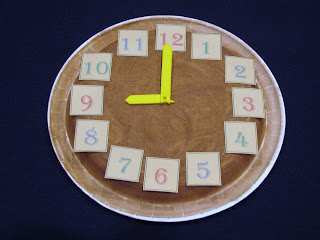
Paper Plate Clock


Materials:
Heavy paper plate
Numbers 1 thru 12 (stickers or print your own)
Foam
Brown paint
Cotton ball
Piece of cord
Attache
Glue stick

Directions:
1. Make a small hole in the center of the plate.
2. Put a small amount of paint on the back of the paper plate.
3. Spread it all over using the cotton ball.
4. Cut the number squares to size, if printing your own.
5. Glue the numbers around the edge of the plate like a clock.
6. Cut the foam to make 2 needles, one big and one small.
7. Using the attache, tack the two needles to the hole in the center of the plate.
8. Make two holes on the top of the clock.
9. String a piece of cord through the holes and tie the ends, so that the clock could be hung.
10. Tick away. Make sure you are on time!

Join the dots, Ganesha picture coloring


Materials:

Printer paper
Pencil
Colored markers
Crayons

Directions:
1. Join the dots on the picture from 1 thro' 80 with a pencil.
2. Trace the outline with a colored marker, if desired.
3. Color the picture.
4. Get creative and dress up Ganesha as you please :).

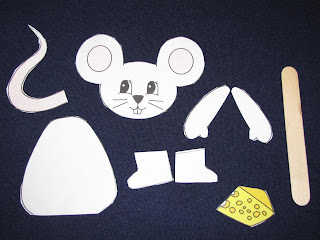
Mouse Puppet


Materials:
White card stock
Black marker
Yellow crayon
Pink crayon
Popsicle stick
Glue stick

Directions:
1. Draw the parts of the mouse on the white card stock.
2. Color the outer ears and tail, pink.
3. Color the cheese yellow.
4. Cut out the parts on the outlines.
5. Stick them together to make the mouse.
6. Stick the mouse on to the popsicle stick.
7. Scurry away! Your mouse is ready.

Ganesha Paper Bag Puppet

Materials:
Brown paper bag
2 googly eyes
yellow, red, black and white card stocks

Directions:
1. Cut the shapes of the crown on yellow, ears on the red, the trunk on the black and tusks on the white card stocks as shown in the picture.
2. On the brown paper lunch bag, use the folded base of the bag as the face and glue all the pieces on to it.
3. Stick the googly eyes and draw the eyelids with a marker.
4. Create your own designs on the crown and put ornaments of choice using marker and crayons.
5. Put the bag on to the hand and move the palm like Ganesha is talking to you!

Crow Puppet


Materials:
3 black chenille stems
1 popsicle stick
2 googly eyes
1 piece of yellow felt
3 black feathers
Glue

Directions:
1. Braid the 3 chenille stems together.
2. Make 2 pieces of the braid, one measuring a third and the other measuring two-thirds.
3. Curl both pieces of braids like a snail, to get a small circle and a bigger circle.
4. Stick the little circle on top of the popsicle stick, to be the crow's head.
5. Stick the bigger circle below that on the stick, to make it the crow's body.
6. Stick the 2 googly eyes on the head and the yellow felt triangle as the beak.
7. Cut the black feathers proportionate to the crow's size.
8. Stick two black feathers on each side and one on its head, making sure that the feather is visible behind the head.
9. The crow is ready to flit and float with your little one.

Sankranti Pot or Lamp

Materials:
Crayola Model Magic (Clay)
Gem stones
Little fingers to work with!

Directions:
1. Take approximately an ounce of the model magic compound in any color of choice.
2. Make a smooth ball using both hands.
3. With one thumb, push into the ball and make a hole.
4. Turn it around, expanding the the hole and deepening the shape.
5. When desired size is attained, pinch one point of the rim, to make room for holding the wick of the lamp.
6. To make a pot, hold the ball between the thumb and index fingers of the other hand and shape the neck of the pot and flatten the rim.
7. Continue expanding till the desired shape and size is obtained.
8. Stick the gem stones as per design.
9. Let it air dry for 5 - 6 hrs. The lamp or pot will hold its shape permanently!

Sheep Hanging Puppet


Materials:
Black card stock
Googly eyes
Cotton balls
Glue stick
Thread

Directions:
1. Cut the black card stock like the palm of a hand. (Children enjoy tracing their own hand and making the cut out).
2. Punch out 2 holes on top of the hand print and tie the thread to use as a hanger.
3. Make a small kink on the thumb of the cut out and glue it down, so that the Sheep's head will look up (as shown in the picture above).
4. The thumb will work as the head, the other 4 fingers will work as the legs.
5. Smear glue all over the palm part of the cut out.
6. Pull pieces of cotton and stick it all over to make it look like a fluffy sheep.
7. Stick the 2 googly eyes on the thumb.
8. Now the sheep is ready to bleat on your door knob or any other place you choose.

Deer Paper Bag Puppet

Materials:
Brown paper lunch bag
Big googly eyes
Red pompom
Black chenille stem piece
Red card stock
Pencil
Glue sticks
Scissors - with adult supervision

Directions:
1. Fold the card stock in two, so that a single trace and cut could be used for two antlers.
2. Trace the shape of the child's hand on one side.
3. Cut out both layers together to get the shapely antlers of the deer.
4. On the base of the paper lunch bag, stick the googly eyes, red pompom nose and the black chenille stem piece for mouth.
5. Make a small fold on the two bottom corners to give the the face a shape.
6. Stick the antlers from the back.
7. Put the hand into the paper bag and move it as if the deer is talking!

Red Hen


Materials:
Red (Hefty brand) disposable cup
2 Googly eyes
Red card stock (for wings)
Yellow pipe cleaner
Yellow beak (could color a white cut out)
Red feather
Glue dots

Directions:
1. Cut out the shape of the wings on the red card stock.
2. Cut the shape of an open beak on yellow card stock, or, cut a white paper beak and color it yellow.
3. Twist two small pieces of yellow pipe cleaners like the toes of the hen.
4. Make 2 holes by the rim of the cup to insert the feet and 1 on the base of the cup for the feather cap.
5. Insert the feet and feather in their respective spots.
6. Use the glue dots to stick the eyes, beak and wings.
7. Cluck along with your Little Red Hen :).

Rabbit Finger Puppet


Materials:
Yellow Poster board
Cotton balls
Brown construction paper
Eyes (googly or plain round)
Satin ribbon
Glue stick
Scissors (under adult supervision)

Directions:
1. Cut the poster board in the shape of a rabbit.
2. Cut the brown construction paper like a 'T' of one centimeter thickness.
3. Stick the vertical portion of the 'T' to the bottom of the rabbit, as shown in the picture.
4. Spread glue on the rabbit, including the part of the construction paper on the rabbit.
5. Pull out pieces of cotton and stick it onto the glued side of the rabbit.
6. Flip the rabbit over and repeat the previous step on that side as well.
7. Stick the eyes on both sides of the rabbit.
8. Tie the lace around its neck. (The edges of the lace can be folded and trimmed like a 'v' by cutting at an angle.)
9. Wrap the horizontal part of the construction paper 'T' around the child's finger - for size.
10. Glue the ends accordingly to make the finger holder for the puppet.
11. Now hop along with your very own bunny rabbit!

Diwali Card


Materials:

Black cardstock
Any colored cardstock or poster board for the diya
Gold or silver card for flame
Colorful stickers to decorate the card
Glue Stick
Crayola Gel pens (They work like magic on dark or black cards)
A beautiful handwriting
A colorful envelop

Directions:
1. Cut the black card to the desired size. (This one was a 8.5 x 11 inch).
2. Fold it in half.
3. The edges could be rounded if desired.
4. Stick the border on the corners of the card. (2 or 4 sides - as per choice.)
5. Cut the shape of a diya on the colored card and flame on the gold/silver card.
6. Glue them on to the front of the card.
7. Decorate the card with the stickers.
8. Use the Gel pens to draw fireworks, candles, more diyas....
9. Write the message inside, the address outside.
10. Mail it out to your family/friends.

Lakshmi Toran

Materials:

Green colored construction paper or card stock
Green wire or string
Lakshmi stickers (could print your own on address labels if desired)
Scissors (with adult supervision)
Glue stick

Directions:

1. Draw the shapes of the long mango leaves on the card stock.
2. Cut them out accordingly. Generally an odd number of leaves are put on the toran. 7 or 9 leaves would be apt.
3. Cut the string according to the desired length of the doorway.
4. Fold the top about a quarter of an inch and glue it such that the leaf hangs from the wire.
5. Stick the pictures of Godess Lakshmi on each leaf.
6. The toran is ready to begin the festivities.

Paper bag Lion puppet


Materials:
One brown paper lunch bag
One white paper plate
White card stock
Brown construction paper
Washable brown paint
Cotton ball
Black marker
Glue stick
Scissors (with adult supervision)

Directions:
1. Print the template (above) onto the white card stock directly.
2. Cut out the shapes.
3. Trace the shape of the inner ear onto the brown construction paper.
4. Stick the brown inner ears onto the white outer ears.
5. Put a blob of brown paint onto the plate.
6. Use the cotton ball to spread the paint to cover the inner circle of the plate.
7. Smear the outer circle of the plate lightly with the cotton ball so it gives the appearance of the mane of the Lion.
8. While the paint is drying, prepare the face of the lion on the brown bag by sticking the eyes, nose, ears and teeth.
9. Draw the nose and whisker spots with the black marker.
10. Fold the painted plate in half.
11. Make a slit in the middle of the plate as shown in the picture.
12. Push in the prepared brown bag (from the bottom end of the bag) into this slit.
13. Glue the paper bag to the plate on the back if required (it may not be).
14. You have your own paper bag Lion puppet to roar with!